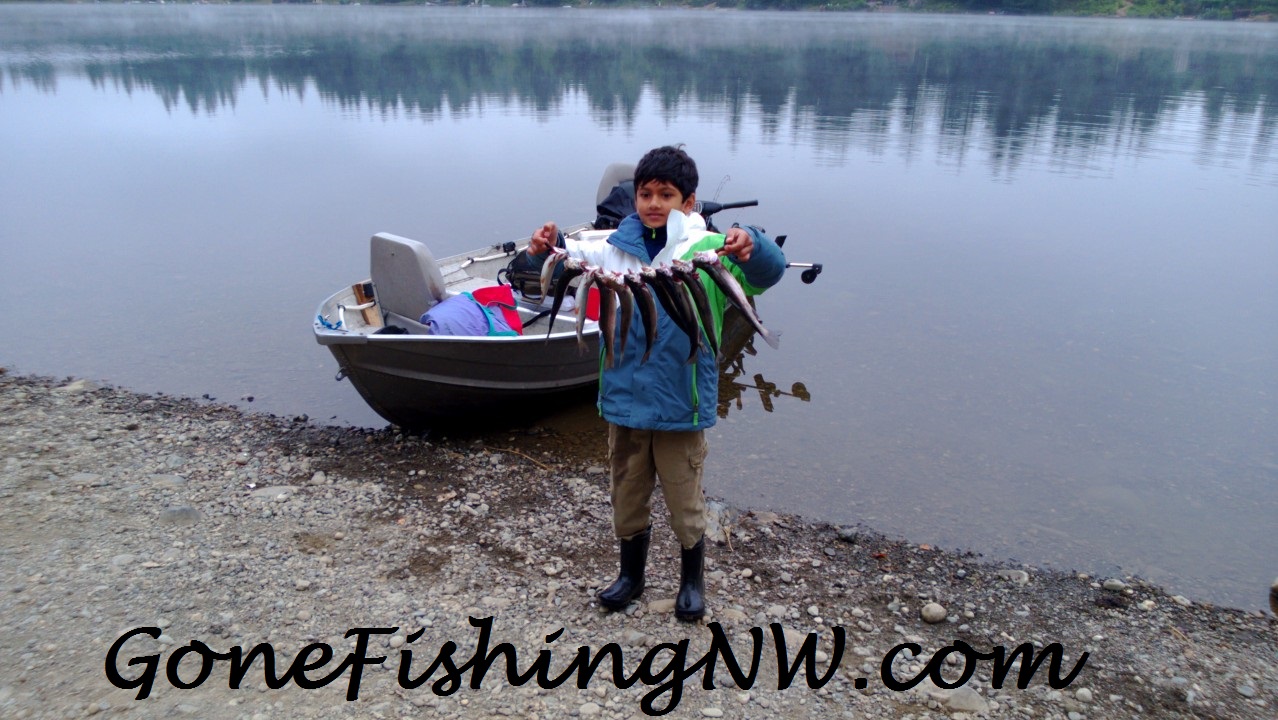
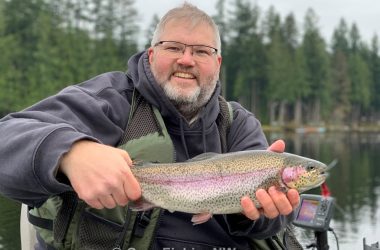
When I hear the opening lines of the song “It’s the Most Wonderful Time of the Year” I don’t think of Christmas. Instead I think of late spring fishing small lakes for trout.
Here in Washington state spring means Opening Day of trout season. Even though there are plenty of places you can fish year round in the state for trout, this is a special time when waters that have been closed all winter open to fishing, prepped by the WDFW with freshly planted trout to augment existing populations.
The general rule should be limits for most people when fishing those first few weeks. Unfortunately, I see so many people just catching a 2 or 3 fish over the source of several hours. I’d like help all of you catch your limit of trout in just an hour or two.
To accomplish this, you don’t need a secret lure, or special spot – only some knowledge about fish behavior and spring time conditions.

Picking A Lake
Odds are there are dozens of lakes within a one-hour drive of where you live that get stocked by the WDFW for opening day. However not all lakes are created equal – some will fish much better than others.

Why that is depends on a variety of factors, but one significant factor for spring fishing is the number of fish that the WDFW plants. However, you can’t just look at the raw numbers, as lakes are different size.
For example, in Crescent Lake in Piece county is getting about 4,500 fish this spring. Compare that to American Lake which gets 27,000 fish. You might expect the fishing in American to be 5 times better. However American Lake is much bigger, 1,125 acres compared to Crescent’s 47 acres. When we take this into account Crescent will get 95 fish per acre and American only 24 per acre.
So the fish density – which will affect how many fish see your lure or bait – is about 4 times higher in Crescent, which may make it the better place to fish.
Obviously there are other factors which will affect if fishing will really be good, like the size of the fish population before the WDFW adds their hatchery fish.
Logistical factors like parking, shore access, boat launch availability, and regulations concerning internal combustion motors will also help you decide if it is the best choice for you.
I’ve made the complete calculation for all the state’s lakes available for your convenience. Here are some other ideas how to research where to fish.
When to Fish
Sometimes we have to fish when we can, not when we prefer. In that case you make the best of it. Other times we fish according to our preference – such as in the middle of warm sunny days when we can enjoy the nice weather as we fish.
However, if your goal is to catch the most fish, then you need to fish according to the fish’s schedule, not yours or the weather.
This is one of two main reasons why I see people struggle to catch fish – fishing when they want rather than when fishing is good.
Trout actively feed in times of low light when they feel safe from predators, and can still find their prey. This means sunrise and sunset. The closer you can fish to those times, the better. Overcast conditions, or a gentle wind disturbing the water will help stretch out that bite a bit more.
There are exceptions, for example as a mid-day insect hatch may trigger a bite for a short period of time. But generally speaking, if you want to catch more fish, you need to fish when the fish are actively feeding.
To learn more about trout behavior and feeding check out the Understanding Stillwater Trout series.
Understanding Where Fish Are
You can fish when trout are actively feeding and have the perfect presentation with your tackle, but you will not catch much if you aren’t fishing where the fish are.
This is the second main reason why I see people struggle to catch fish.
There are two ways to think about fish location – horizontal and vertical.
Based on what I’ve observed over the years, as it applies to fishing around opening day, people tend to get the horizontal mostly right. The problem is mostly with the vertical.
Simply put, water temperature is a major, perhaps even the most significant, factor which determines what depth the trout will spend the majority of their time. Rainbow trout prefer, and are most active, in water where the temperature is 54-60 degrees.
In the spring, here in Washington, most lakes are still warming up from winter. During this time of year only the top of the water column will have reached that mid to high 50s range. This means that the fish will mostly be in the top 5 feet of water. Regardless of what technique you are using, this is where you need to focus your fishing.
They may be a little shallower if the lake has been slow to warm up, or deeper if it warmed up quicker. Bright sunlight may also cause them to go a little deeper too.
With respect to the horizontal locations, focus along the shoreline, near shallow structure, points and bays. Be observant and watch for fish jumping or rising, and where other people are catching fish.
To learn more about how to locate where trout are read the Understanding Stillwater Trout series.
Fishing From The Bank
The majority of fishermen do so from the bank, and these spring time conditions are ideal for bank bound anglers. The water temperature in the shallow waters is perfect for them, and a place the trout will cruise for food.
There are three main techniques I’d like to focus on for how to fish from the bank.
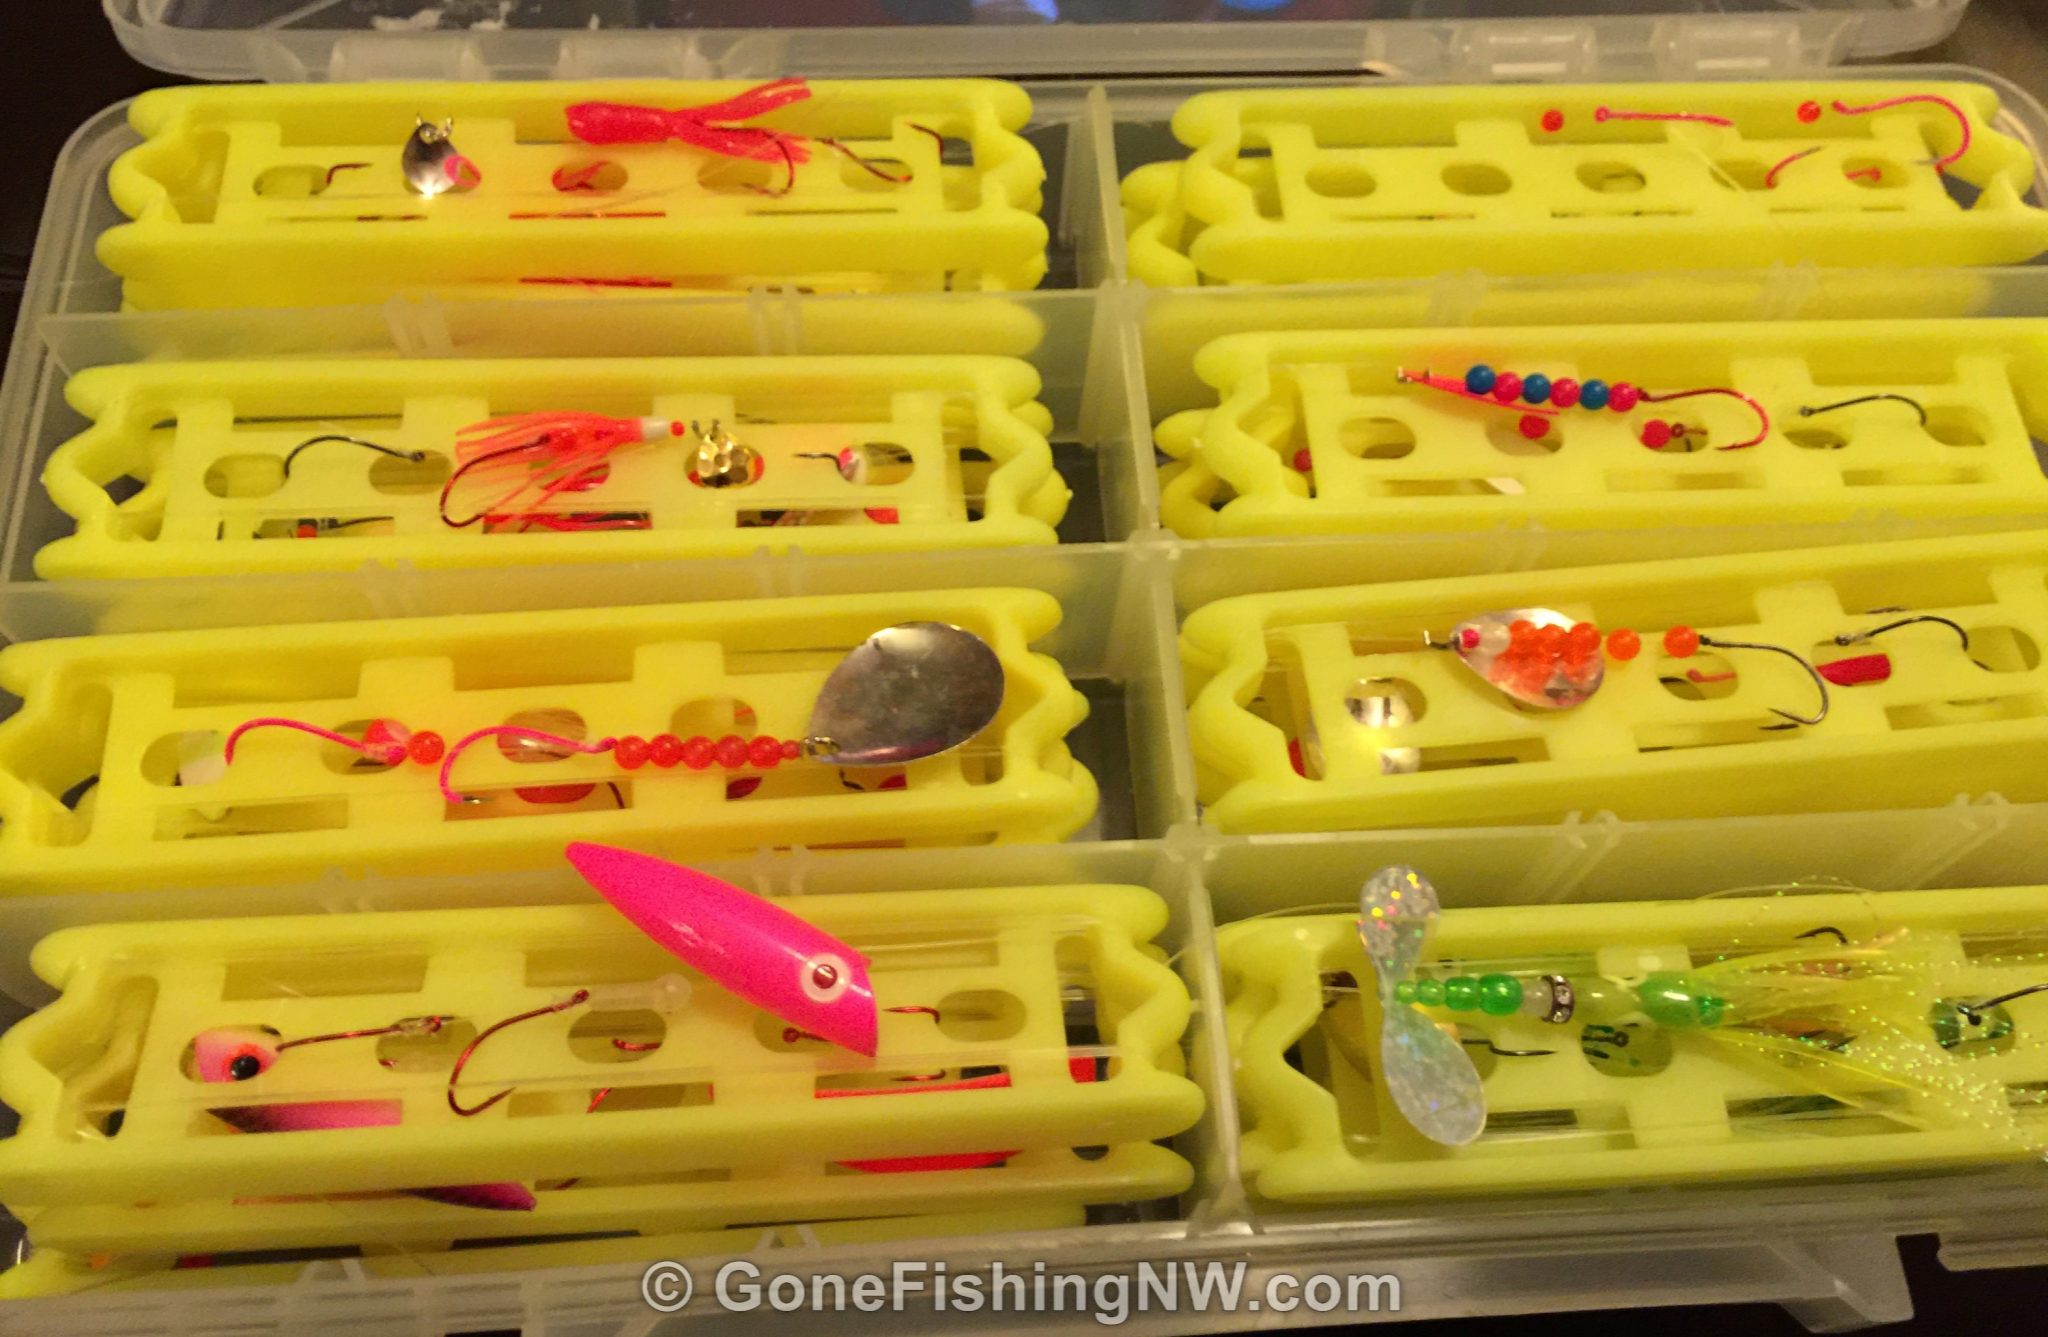
Powerbait Off The Bottom
Bottom fishing is using some kind of floating bait, like powerbait, off the bottom. This is the most popular approach I’ve seen used for bank fishing in western Washington. It is ideal for the crowded days which occur around opening day, because your gear stays in place after it has been casted out.
The concept is simple. Attach a heavy weight to your mainline. Then attach a leader of a known fixed length, with a hook on the end. On the hook add some kind of bait that floats.
When you cast it out, the weight settles to the bottom and the bait will float above it. The length of the leader controls the depth of the bait, relative from the bottom.
Set the rod in a holder, and then wait for the rod tip to wiggle when a fish takes the bait.
As mentioned earlier depth is critical. So the trick is how to do ensure your bait is in the top 5 feet? The math is simple, take the depth of the water you are fishing and subtract your leader length. The result is how deep your bait is.
The problem is knowing what depth the water is that are you casting into. A good rule of thumb is to cast out and then count how long it takes your weight to sink. The number of seconds is roughly equal to the depth of the water in feet.
The other variable you have control over is color of bait. Everyone has their favorite color which they say outperforms all others. In my experience though, the fish are rarely that picky. For spring time, I suggest focusing on UV reflective colors like fluorescent pink, fluorescent orange, white and chartreuse.
There are many ways to setup a bottom fishing rig, but I’ll share my favorite:
- An egg weight – usually 1/4 ounce
- A small bead
- A snap swivel
- Fluorocarbon leader material, usually 4 or 6-pound test
- A size 8 octopus hook
- Container of power bait in your favorite color
Thread the weight onto your mainline, followed by the bead. Then tie on the swivel part of the snap swivel, using the improved clinch knot.
Next determine the leader length you want, and measure that much out. Make sure to include a few extra inches to account for the knots.
On one end, tie on the hook. I like using the egg loop knot to attach an octopus hook to a line. On the other end tie a loop knot, like the surgeon’s loop.
Snap the swivel snap around the loop in the leader, so everything is attached.
Lastly add some bait to the hook. Personally I like using the power eggs as they are less messy than the dough bait. If using the power eggs make sure the point of the hook is sticking out the other side of the egg.
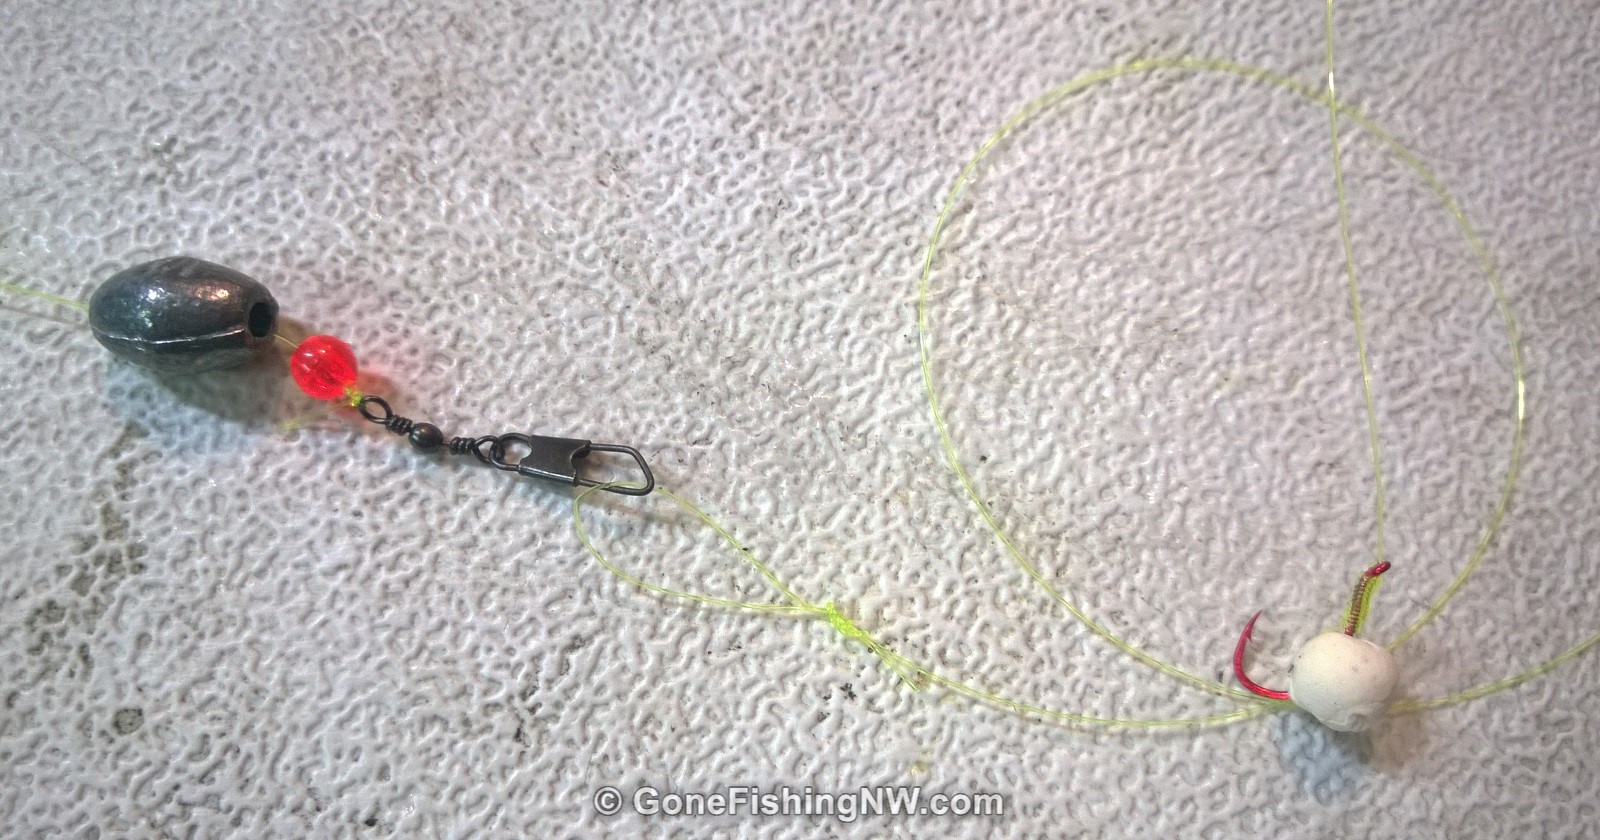
If the leader is over 6 feet, then I add a second egg to ensure enough floatation to lift the hook and leader up all the way.
Cast this out and let it settle to the bottom, then wait for a bite.
Worms Under A Bobber
Another great spring time approach is the classic worm under a bobber. Maybe it is the kid in me, but I always get a kick out of watching that bobber pop under the surface when a fish takes the bait.
Since your bait hangs down from the bobber calculating how deep your bait is trivial, simply measure how much line is between the bobber and bait.
Nightcrawlers are a classic bait with this rig, but salmon eggs, velvetta cheese and even wad of bread can be used with success. The key is that the bait needs to sink, not float.
To setup a bobber rig you will need:
- Bobber
- Snap swivel
- Split shot
- Fluorocarbon leader
- Size 4 octopus hook (assuming nightcrawler, use small hook for salmon eggs)
- Some night crawlers
At the end of your mainline attach the snap swivel with an improved clinch knot.
Measure out 3 to 4 feet of leader. Tie the hook onto one end with the egg loop knot. Use a loop knot, like Surgeons Loop, on the other end. Put loop in the snap.
Next add split shot. I’ll usually put a couple of larger split shot on the mainline, right above the swivel. If I’m not confident about my bait sinking, then I’ll put the smallest splits hot possible a foot or so above the hook.
Next attach the bobber to the mainline at the right distance from the hook. Sometimes the bobbers will slide, so you may need to loop the line around the bobber attachment.
Next take that night crawler. Most are too big, so cut off about one inch. Slide it onto the hook and up the line. The worm should be stretched out straight, not free to bunch up. You want it to look like a leech – and when was the last time you saw one of those in a tight ball?
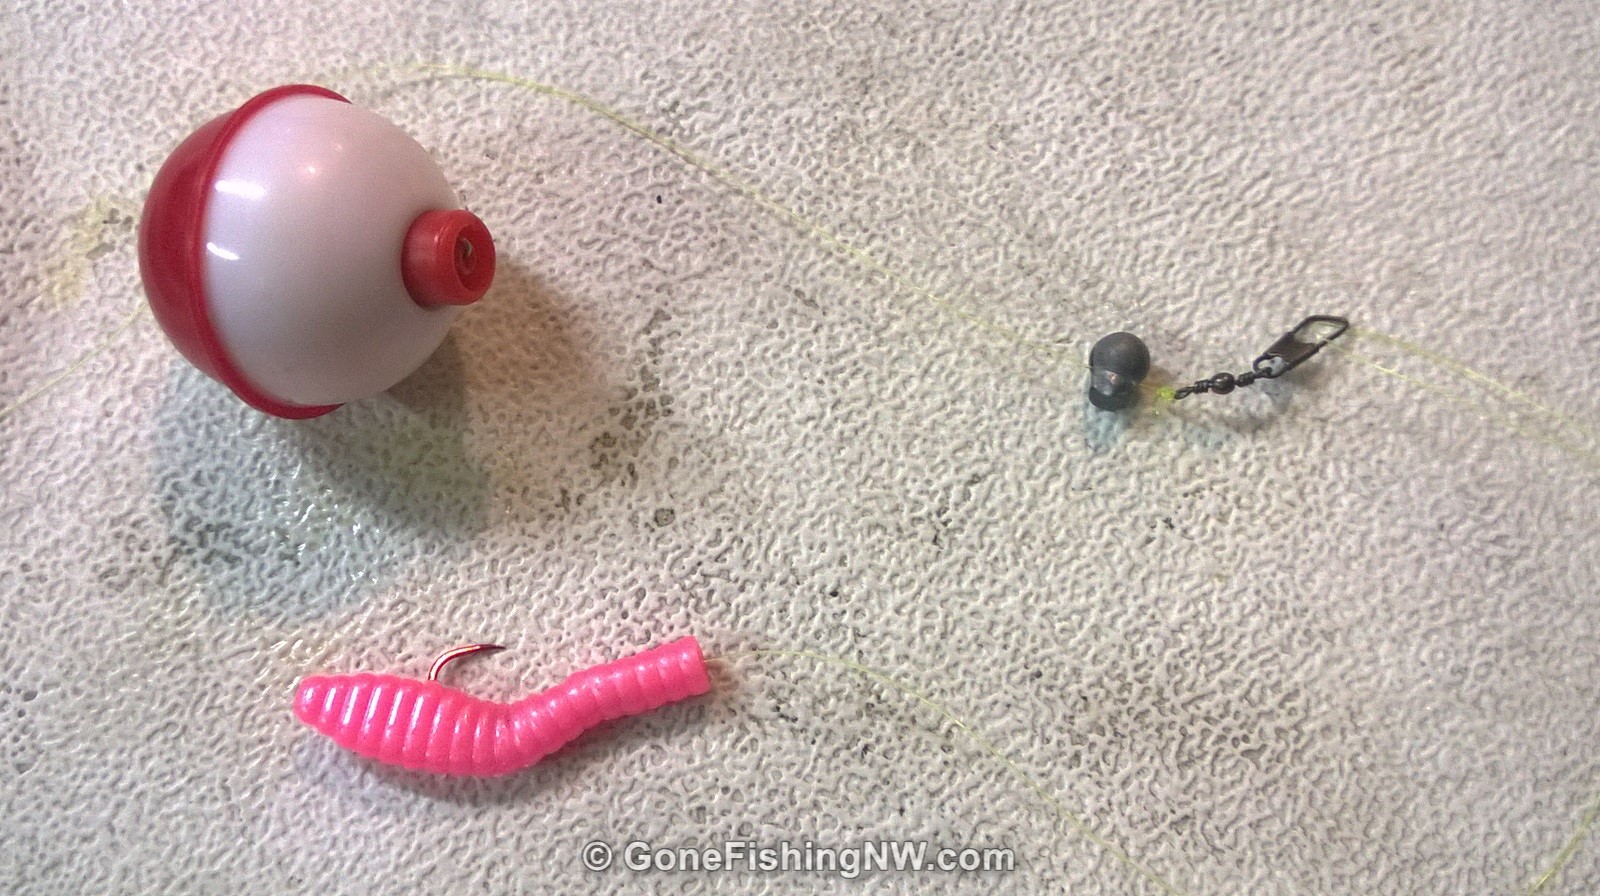
Then cast out and watch that bobber go under.
Casting Spinners
Very rarely do I see people fish with spinners from shore, but they can be a very effective way to fish. This approach works best when you have room to cast in a fan pattern, working your casts from left to right to cover different water.
Lighter spinners which work when retrieved slower work great, as they will be easier to keep in that top 5 feet, without retrieving too fast. Panther Martins are a great choice. Like powerbait UV colors are excellent choices.
To rig up the spinner is easy – just tie it directly to your mainline.
Cast out in the desired direction. After it hits water, close the bail and lower your rod tip so it is close to the water. Then retrieve just fast enough so the blade is turning. If you aren’t getting hits, then experiment. Let the spinner sink more before starting your retrieve, or vary the speed of your retrieve.
Fishing From A Boat
If you have access to a boat, then your options on where and how to fish really open up. With a boat you can fish areas out of reach from bank access spots, and even fish lakes that have no place to fish from shore.
One way you can fish from a boat is to go to a spot, drop anchor, and then fish the same way you would from the bank. When doing this it can be helpful to drop two anchors – one at each end of the boat – so the boat will not turn if the wind blows.
A better way, I feel, to use the boat when fishing is to take advantage of the mobility it gives you to actively fish a lot of water. Why wait for the fish to find you, when you can go hunt them down?
Drifting
If there is a little bit of wind, then you can drift and fish. This works great for things like casting spinners or float fishing.
Simply position the boat upwind of the area you want to drift through. Align the boat so you will drift sideways – that will give you the most room to fish. Then cast your gear downwind. It is important to do it downwind, so you are fishing water that the boat hasn’t just gone over. Generally speaking, the trout will avoid the boat, so fishing water you just passed over isn’t going to be very successful.
As the boat drifts you will continually fish new water. When you reach the end of the area you want to drift you can either motor back and do it again, or pick a different spot to drift through.
Trolling
Trolling is my favorite way to fish. There are many advantages, such as covering lots of water, keeping your gear at the right depth for long periods of time, and being able to fish far from the boat.
A classic lure to troll is a wedding ring spinner – usually tipped with a bit of bait.
However, I’ve had great success on two different simple rigs, based on my simple trolling rig, – a basic nightcrawler rig and a fly rig.
Regardless of what rig you use; the mechanics of trolling are the same.
- Start the boat moving. For spring trout, a speed of 1.0 to 1.2MPH usually works best.
- With your lure attached, let out line so the lure is behind the boat.
- When you have 50 to 100 feet of line out, stop letting out line
- Put the rod in a holder and drive the boat around the area you want to fish
Usually you’ll need to add some weight to achieve the desired depth. The amount of weight varies by speed, what type of lure and mainline and amount of line out. Unfortunately, I don’t know of any simple formula to figure this out, instead you have to rely on your experience with your gear to build a good mental model.
However, for spring fish I’d start with one size 7 split shot, and increase it to two split shot if you aren’t getting bites. Maybe add a third if is really sunny or the water has warmed up more. Put the split shot about 4 feet in front of the lure, to avoid scaring the fish.
Night Crawler Trolling Rig
To tie the night crawler rig, you will need:
- Fluorocarbon leader material – 6 pound test works well
- Two size 4 octopus hooks
- Optional Wiggle Fin Action Disc
- Some night crawlers
Cut about 4 to 5 feet of leader material. Using the egg loop knot tie a hook on the end. Slide the second hook down the line and tie it into place, also with the egg loop knot, about 1 inch above the first hook.
If using the Action Disc, slide it on next. The stem should point towards the hooks and the cup part facing away from the hooks.
Then attach the other end to your mainline, usually with a loop knot if your mainline end with a snap.
Next take a night crawler. Hook one end of the worm on the top hook. Put the second hook in where it naturally lies on the worm. Cut the worm about ¼ inch below the hook.

This setup can be a killer. Here is a tip when using it – if a fish hits it, but doesn’t hook up, then open the bail on the reel and let out line. Count off 5 seconds, then close the bail. More often than not, as that line becomes tight the fish will hit again.
Fly Trolling Rig
This is the setup I use the majority of the time now. When it comes to trout I almost exclusively practice catch and release. I use flies because bait limits catch and release – both by regulation and my personal ethics – due to its associated high mortality.
My fishing doesn’t suffer due to this. I catch fish just as quick on flies as I ever did with bait.
To tie up the fly rig you’ll need:
- Fluorocarbon leader material – 6 pound test works well
- The fly
- Optional Wiggle Fin Action Disc
Cut about 4 to 5 feet of leader material. Tie the fly on with the improved clinch knot. If using the Action Disc then slide it down the line with the stem pointing towards the fly.

The attach the leader to the mainline with a loop knot for the snap.
What Are Your Thoughts?
If you enjoyed this article please take a minute and signup for my weekly newsletter.
Is this information helpful for you? Anything specific you do when fishing for spring trout?
Comments are closed.