If you hang out around a marina, boat launch or other places where fishermen are with their boats you’ll notice that just about every boat is equipped with a fish finder. It is considered an essential piece of equipment, but for most people it is a waste of money because it doesn’t help them catch more fish. The reasons for this are many.
Hopefully as we understand the reasons why people are not getting the value from their fish finder, we can then take steps to correct this. First we will cover the things preventing you from getting full value out of your finder. Then we will discuss how to fix get more out of it.
Why Your Fish Finder Is A Waste Of Money
Lets examine some common reasons which cause fish finders to be a waste of money, instead of a useful tool.
Bought A Piece of Junk
Perhaps the most common reason for not getting value out of the fish finder starts at the store. Many people buy a unit which just isn’t up to the job. It might be the unit that was on sale, or maybe it was just the cheapest unit available.
Years ago my friends and I had an inside joke. It went something like this – “What is the difference between a depth finder and fish finder?” The answer – “About $500.”
As time has gone on the price difference has gotten smaller, but the reality is the same. The cheap units are going to find bottom, but will struggle being the great fishing tool a better unit would be. If you are shopping for a fish finder, you need to know what the features are and what they do. Once you are an informed buyer you can choose the unit which matches the type of fishing you plan to do.
Bought The Cadillac
The other end of the spectrum I’ve fished with people who have really nice multi-thousand dollar units. But on the water, they hardly seemed to give the unit a second glance.
There is no doubt these are good units, but the more you pay then the more value you need to get from it in order for that money to be worth it. Its like buying a sports car and then only using it to drive around the block.
If you have the time to master using a top of the line unit, believe those features will help your fishing and have the money then go ahead and buy that really nice unit. If not then buy a more affordable unit.
Old Finders Are Not Gold
There is an old folk saying that “Old friend are gold.” That may be true for friends, but it is definitely not true for fish finders. If your tablet or smartphone was five or six years old, then you’d replace it with a newer model. So why not your fish finder? Like your smartphone modern fish finders are sophisticated units running complex software.
Your finder may have been great several years ago, but compared to new ones today for a similar price range it is now just OK. Features only available in top of the line units five years ago, are now standard in units in the mid-price range.
Make sure to upgrade your fish finder on a regular basis. Once your finder is about four years old you should seriously start thinking about replacing it. If it is over six years old then it is likely overdue.
Build On A Good Foundation
Even the best of fish finder units will not function properly if not correctly installed. Bad installations can account for a number of issues people have with their fish finders not working properly.
Often times I’ll hear people complain about such and such a brand or unit model when really the problem has to do with how the transducer or fish finder is mounted.
Make sure to read the installation instructions very carefully and follow them. Common installation problems are:
- Transducer is mounted behind or near turbulence causing structure
- Wiring is next to electrical interference, such as other cables
- Extra transducer wire improperly coiled
- Transducer not level
If you have a hard time getting good results out of your fish finder, then the first thing to do is to double check it is installed right.
If you had the fish finder professionally installed you may think you don’t have to worry about proper installation. However, don’t make that assumption, and double check the setup – especially if having issues. A friend of mine recently took his boat to a well-respected marine shop to install a new fish finder. Unfortunately, he had issues with the finder after the install. It took three return trips to the shop for them to finally figure out and fix the problem – which was that the transducer was mounted behind a strake, and the turbulence caused by the strake was interfering with proper operation.
Not Configured Correctly
Many people just accept the default settings, not realizing this is hurting their ability to use the fish finder as a fish catching tool. Many finders have settings like fish identification, different colors, sensitivity adjustments, transducer selection and so on.
Incorrect values for these settings will cause your finder to not properly display fish and structure.
Don’t Know How To Use It
I often get blank stares from people when I ask what frequencies their transducer supports. They don’t know what their unit can do, or why they would want to use a given feature or how to use it.
Its like having the latest iPhone and all you know how to do is make phone calls on it.
Don’t Look At It
The last problem I see is people who have a finder on their boat but don’t use it. Maybe this is because they have given up on it as a useful tool. In any case an unused finder is one that is not helping you catch fish.
How To Make Your Fish Finder A Fish Catching Tool
Now that we’ve covered various mistakes people make with fish finders, lets talk about how we can get maximum value out of them.
How Fish Finders Work
Fish finders are complicated systems and one could write a book explaining it. So I’m just going to highlight a few key concepts and features. Each brand has its own marketing names for the various features, so you will need to mentally map your brand’s name to the concepts.
There are more features than I outline here, so make sure to do more research if you really want to understand them.
The Basics
In it’s basic form a fish finder consists of a transducer and a head unit. The transducer generates an underwater sound wave at a given frequency. When that sound wave encounters something it bounces off that and returns back to the transducer.
Based on the time elapsed and strength of the return the head unit can determine the distance from the transducer and hardness of the object. This data is then displayed on the screen. Distance is shown as depth. Hardness as color.
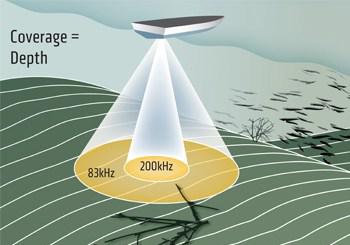
The sound wave spreads out as it travels. It is narrow just below the boat, and at its widest when it hits the bottom of the water column. This is known as the sonar cone, and it can be measured in degrees. For example, a 20 degree cone is narrower than a 35 degree cone. Wider cones are going to capture more fish and structure.
The frequency of the transducer affects three things – the angle of the cone, maximum depth and resolution. Lower frequencies have large cones, can penetrate deep water and have low resolution. High frequencies have narrow cones, work best in relatively shallow water, and high resolution.
Normal sonar usually works in frequency ranges of 50kHz to 200kHz.
Downscan Sonar
Downscan sonar is a high frequency sonar. The frequency range is usually in the 450kHz to 800kHz. The high resolution this frequency gives can really help define what is under the boat.
For example, an underwater tree might look like a school of fish or a bait ball with regular low frequency sonar. However, with downscan sonar you will be able to identify it as a tree, as you’ll see the trunk and branches.
This is really great when going after fish which like hanging out near structure.
CHIRP
CHIRP is a relatively new sonar technology. It has been common in mid-range units for several years now. What it does is combine data from different sonar frequencies, such as downscan and normal sonar. It tends to provide better images than the frequencies used separately.
If you fish with downriggers you are probably used to downrigger balls making wide lines on your sonar screen. CHIRP can help resolve the ball with more resolution, which results in thinner lines on your screen – making it easier to spot fish around that depth.
Side Scan Sonar
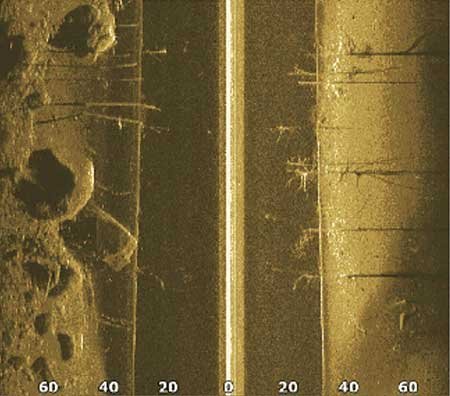
Side scan sonar used to be a feature exclusive to high end units, but in the last couple years it has made it to mid range units. It is a high frequency sonar beam that projects a narrow beam to the sides of the boat. This allows you to see things to the side of the boat.
It can take some practice to learn to read side scan sonar, since the display is very different from traditional sonar.
Other Features
There are features I’m not going to go into detail on, but are present on many modern fish finders such as wifi/Bluetooth connectivity, screen mirroring, networking with other boat devices and so on. These are great features, but are not as core to the central to helping you get fish in the boat.
In addition there are several other features which are currently the domain of high end units that I’m not going to cover – such as 360 sonar, forward looking sonar and 3D mapping.
If you are interested in these features please research them on the web site of your favorite fish finder brand.
Buy The Right Unit
Getting the most out of your fish finder start with purchasing the right unit. This is a moving target as the technology keeps changing, however if I were to go shopping for a unit today this is what I’d look for:
- A large screen – at least 7 inches
- The large screen will let you display more information – like a chart and sonar. It will also let sonar images display with higher resolution, which will make identification of sonar images easier.
- CHIRP, down scan and side scan sonar
- CHIRP will give you better images, and side scan can help you cover more water.
- A freshwater transducer.
- These normally support 83/200kHz for the regular sonar. Saltwater transducers do lower frequencies to support deeper water. Unless you regularly fish depths greater than 200 feet, you will get better performance from the freshwater models.
- GPS
- This may seem like an extra but a GPS comes in very handy. It can give you speed information, as well as showing where you are on the chart. I find mine very helpful to go back over a school of fish were I just hooked one.
- On the fly mapping
- Modern units also support building a contour map on the fly as you fish. This is very helpful in finding drop offs and other spots where fish like to hang out. The quality of these maps is usually much better than the ones on the “map cards” you can buy.
Expect to pay between $600-$900 for a unit which meets all those qualifications. A few units to consider are:
- Hummingbird HELIX 7 CHIRP SI G2N
- Lowrance Elite-7Ti
- Lowrance Elite-9Ti
- Garmin EchoMap 72SV
- Ray Marine DragonFly Pro 7
Install It Right
After you have your unit picked out and purchased it needs to be installed. As we discussed previously proper installation is key to correct operation. They typically are relatively easy to install.
First read the directions very carefully, and then re-read them.
When mounting the transducer make sure to:
- Place it in a low turbulence area as far from motors, strakes and other structure.
- Make sure the transducer is level and sits below the water line – typically it hangs just a little bit under the hull.
- Route the wire away from other wire, if possible.
- Coil any extra wire in a figure 8 pattern and secure it with a zip tie
When mounting the head unit make sure to:
- Mount away from other electronics or wires
- Coil any extra wire in a figure 8 pattern and secure with a zip tie
- Ensure it has a good source of clean power – ideally it should be on its own battery.
After the install spend time verifying proper operation before focusing on fishing.
Configure It Properly
Once it is installed you need to get out on the water and configure it correctly. The specifics of the configuration should be listed in the owners manual of the unit, however some general things to do are:
- Select the correct transducer
- Set the mode to the type of fishing you’ll be doing (shallow water, slow trolling, salt water, etc…)
- Turn off any “Fish ID” feature as they never work
- Increase the scroll speed
- Increase the sensitivity all the way, then dial it back until the picture is mostly clear
- Choose a good contrasting color set
- Set the frequency/CHIRP mode to what works best for your fishing
- I prefer mine set to a lower frequency to get a large cone.
This may take some time to get dialed in right. Focus on getting it setup before trying to do serious fishing. Don’t be afraid to try different things as you become comfortable with the unit.
Learn How To Use It
Spend time reading the users manual, watching training videos from the manufacturer and pro staff, and play with the unit. Become familiar with what the unit can do and how to make it do it.
Personally I like to have the screen split with half being the chart and the other half being the sonar. This lets me see where I’ve been as well as sonar information. If I’m fishing near structure I may also add downscan to the screen – so I can see it side by side with the sonar. This is one reason a large screen is helpful.
Zoom In
Often there will be a specific depth that we are focused on. Using the zoom feature of the sonar is a way to get more information about that depth by providing more pixels to render that sonar data. This will give you better images of the fish at that depth.
Sonar and Downscan
Sometimes you may see something on the finder that you aren’t quite sure what it is. In these cases putting the downscan side by side with the sonar can help you figure it out.
Below is an example from a lake I fish. In a particular location there is something that looks like a thick school of fish. However it is actually a couple trees from before the lake was made by a dam. In the downscan you can see the tree trunks sticking out.
Determining Fish Depth
You may think that if the fish finder shows a fish down at 50 feet, that the fish is 50 feet down. That may not be true. Remember the finder measures distance from the transducer and that the sonar cone spreads out.
If the fish is directly over the boat then the depth reading will right on. However if the fish is at the edge of the cone, then the distance from the transducer will be greater than the depth of the fish. This effect will be worse the farther the fish is off center and the depth.
The fish might be near the edge of the cone if:
- The fish doesn’t show up if you switch to a higher frequency (smaller cone degree)
- The fish mark is partial
- The fish mark is lighter compared other marks
- The fish is significantly deeper than the depth you are catching fish at
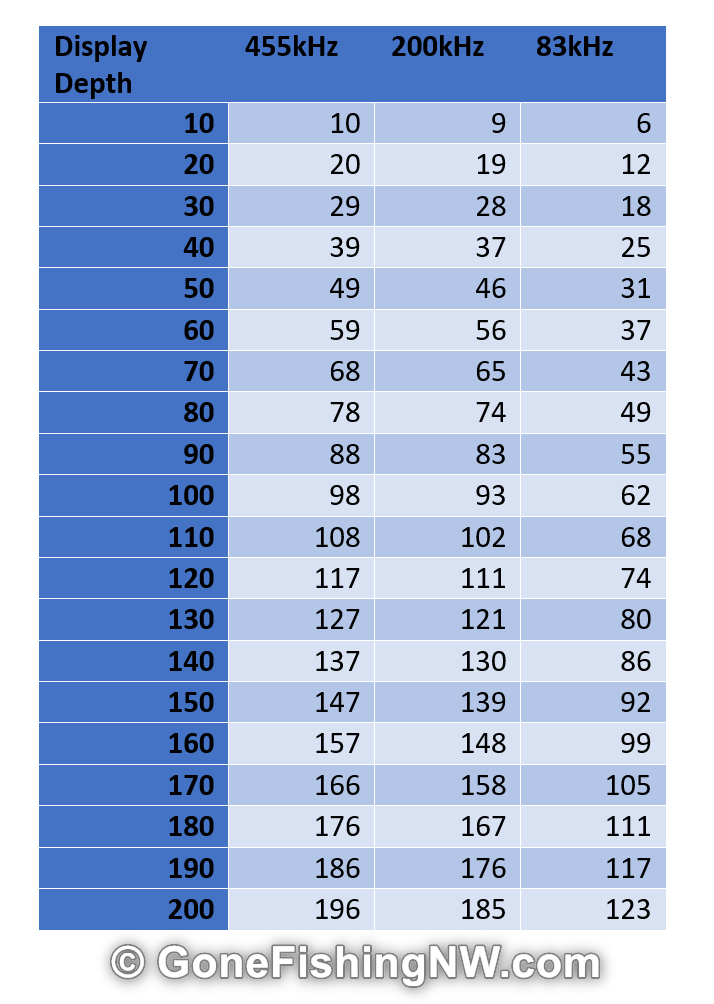
The following chart uses common cone angles and tells you real depth from the display depth – IF the fish is on the edge of the cone.
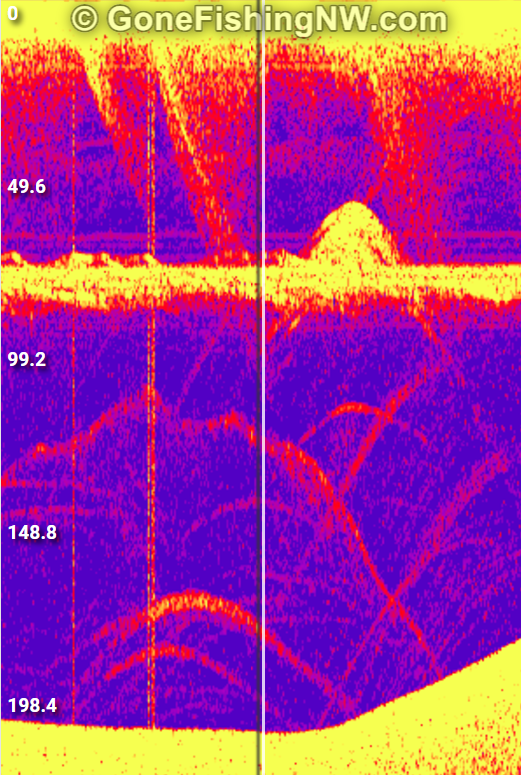
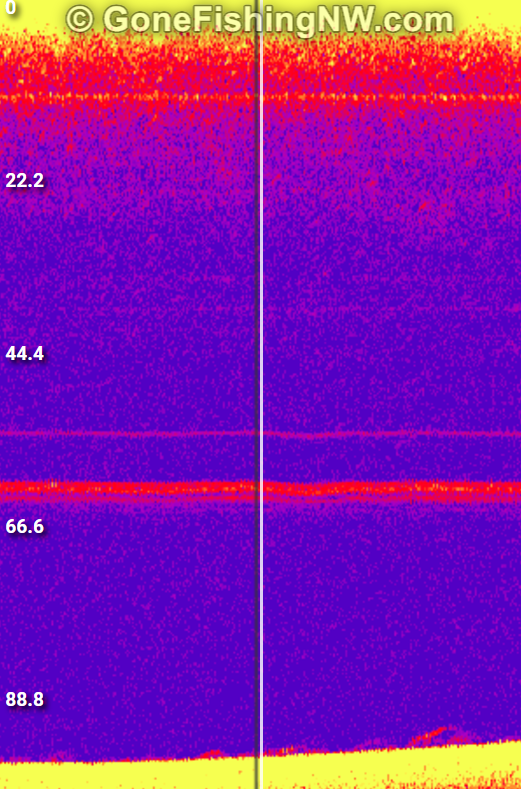
In this sonar image below we were catching fish about 75 feet down. You can see strong fish returns around the lines from the downrigger balls. However you can see some fainter marks displayed at 120 to 140 feet. These fish are near the edge of the sonar cone, which was 83kHz. When we run that through the chart we get a real depth of 70 to 85 feet which is right in the zone where we were catching fish.
Hit A Fish School Again
Sometimes you’ll have a bite or catch a fish, and then you want to go back to that spot since other fish are likely to be there. You can easily do that by saving a waypoint in the GPS and then navigating back to that spot.
Practice
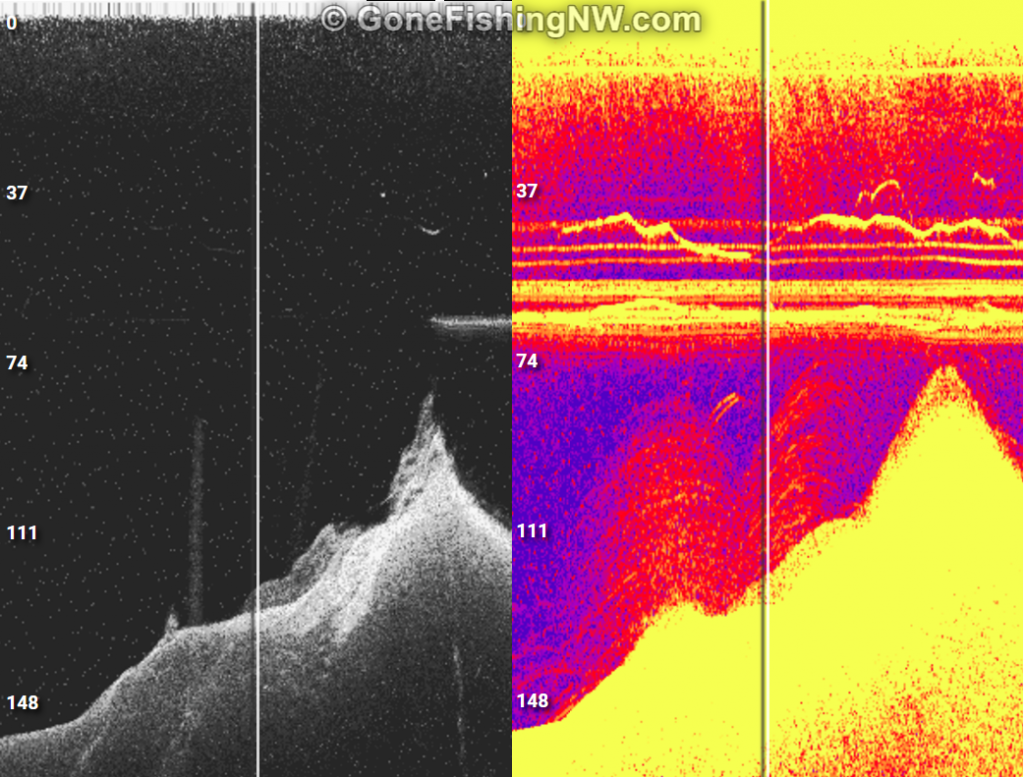
Lastly spend time on the water watching the finder and experimenting with the settings. Learn what different types of bottom look like. Learn to identify fish from structure, sonar noise and jetsam. For example below is a sonar picture of a couple of fish right on bottom.
One does not become a fish finder expert overnight, so expect to spend time with the unit practicing.
Comments
Make sure to subscribe to the newsletter and like the Facebook page.
Do you use a fish finder? Do you find it to be a useful tool? What tips would you share with someone about how to get the most out of their unit?




Comments are closed.