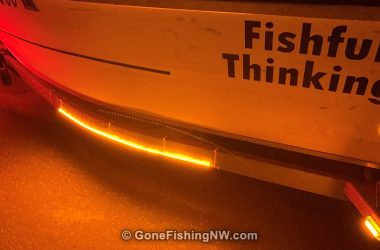
I’m fortunate in that I’m able to store my boat in the garage. However, it is quite a tight fit, that requires positioning the boat just right, with the boat being positioned diagonally. The reason is that the boat and trailer – end to end – is 24 feet long, and my garage is 21 feet long.
While this works, it does make it a pain when putting the boat back in the garage, plus wasting space in the garage that could be used for other things. Ever since I bought the boat I’ve wanted to install a swing tongue – also called a folding tongue – to make it easier and reclaim garage space.
Now that I’ve pulled the trigger and did the conversion, I thought I’d share my experience for anyone else thinking of doing the same thing. It is a bit intimidating, since if you mess up it may be hard to recover- however it really isn’t that hard. A boat shop can do the conversion for you, but the prices I was quoted was in the $250-$300 for the labor – not including the parts needed – and I decided I’d rather use that money for other things than keeping a boat shop in business.

Preparation
Before the actual install, some time needs to be spent to prepare, so the install goes smoothly and gives you the results you want.
Hinge Selection and Position
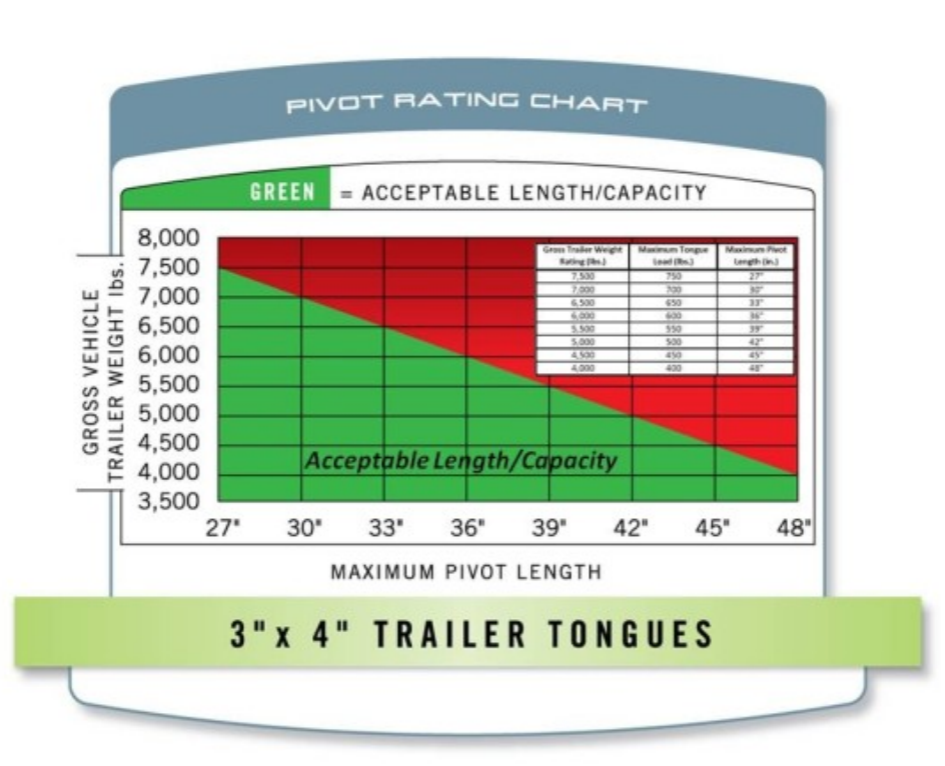
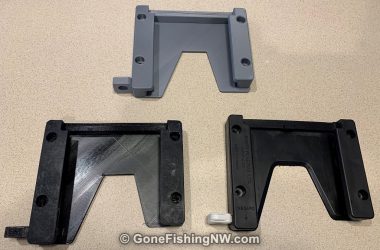
The first thing to do is to measure the tongue frame, as there are different sizes. The size will determine what the right part is you need to get. Mine was a 3×4 frame.
The hinge part comes in both bolt-on and weld-on versions. As I don’t know how to weld and didn’t want to hire a welder, the choice for me was simple. The research I did showed there was no disadvantage to doing the bolt-on, and it does allow the hinge to be removed or replaced easier if there was ever an issue.
Next, you want to determine how long to make the swinging part of the tongue. This will depend on a few factors – the size of the trailer frame, maximum weight of the loaded trailer and any possible obstructions on the trailer. Look at the installation instructions for the hinge part you bought to determine the maximum length you can make the swinging part. Here is a link to the install instructions for Fulton hinges. Next look at your trailer to determine if there are any obstructions which would limit how long the swing tongue can be. For my trailer, the winch arm is mounted 23 inches from the tip of the tongue – which meant the swing tongue can be up to 18 inches long since the hinge requires 5 inches of clearance.
Safety Chain Considerations
The next thing to think about is the safety chain. The chain needs to be mounted behind the hinge. If yours are already mounted back far enough, then that is one less thing you need to worry about.
However, in my case, the safety chains were mounted near the end of the tongue and had to be moved back. If you need to move them back, then you might need new bolts to secure them. The bolts and nuts should be stainless steel and ½ inch diameter. I like using locking nuts, so they don’t wiggle loose from road noise over time. You may want to have a few large washers as well. It is important to use stainless steel as it is corrosion-resistant.
Electrical Wiring
The electrical wiring should not require much work, assuming you are happy with the current wiring and the plug can be removed and reinstalled. If it can’t be easily reinstalled, then this may be a good time to convert to a 7-pin plug. Some information on how to do that is located in this article about installing backup lights on a trailer.
You will need some tubing to group the wires together and provide some protection from them getting pinched. Some electrical tape will also come in handy.
Tools
Additional tools you will need are:
- Wrench
- Socket set
- Corded Drill
- Drill Bits – 1/8, 1/4, 3/8 and 1/2 inch
- Angle Grinder
- Files
- Safety Glasses
- Gloves
You may think your “around the house” cordless drill is fine, but for my trailer, it was tough drilling and I had to drill 18 holes through hard and thick metal. After having to pause to recharge the battery a couple of times, I eventually borrowed a friend’s high torque corded drill – the drilling went much faster with that.
The instructions say you can cut through the tongue with a reciprocating saw. If you try that be prepared for it to take a while and to go through a few saw blades. An angle grinder is much better.
Make sure you have good safety gear – glasses and gloves. As you work there will be sparks and bits of hot metal flying around.
Installation
The hinge should come with installation instructions – read them several times and make sure you understand them before starting. I’m not going to repeat those instructions here, but instead, I’m going to highlight some of the things I learned while doing the installation.
Cutting the Tongue
First, when disconnecting the wires from the plug make sure to keep track of what pins the various wires connect to, so you can hook them back up correctly. I took a picture of mine. Before you disconnect it, you may want to test the trailer lights so if things don’t work after being hooked back up you know it is from your project and not something like a pre-existing short or broken bulb.

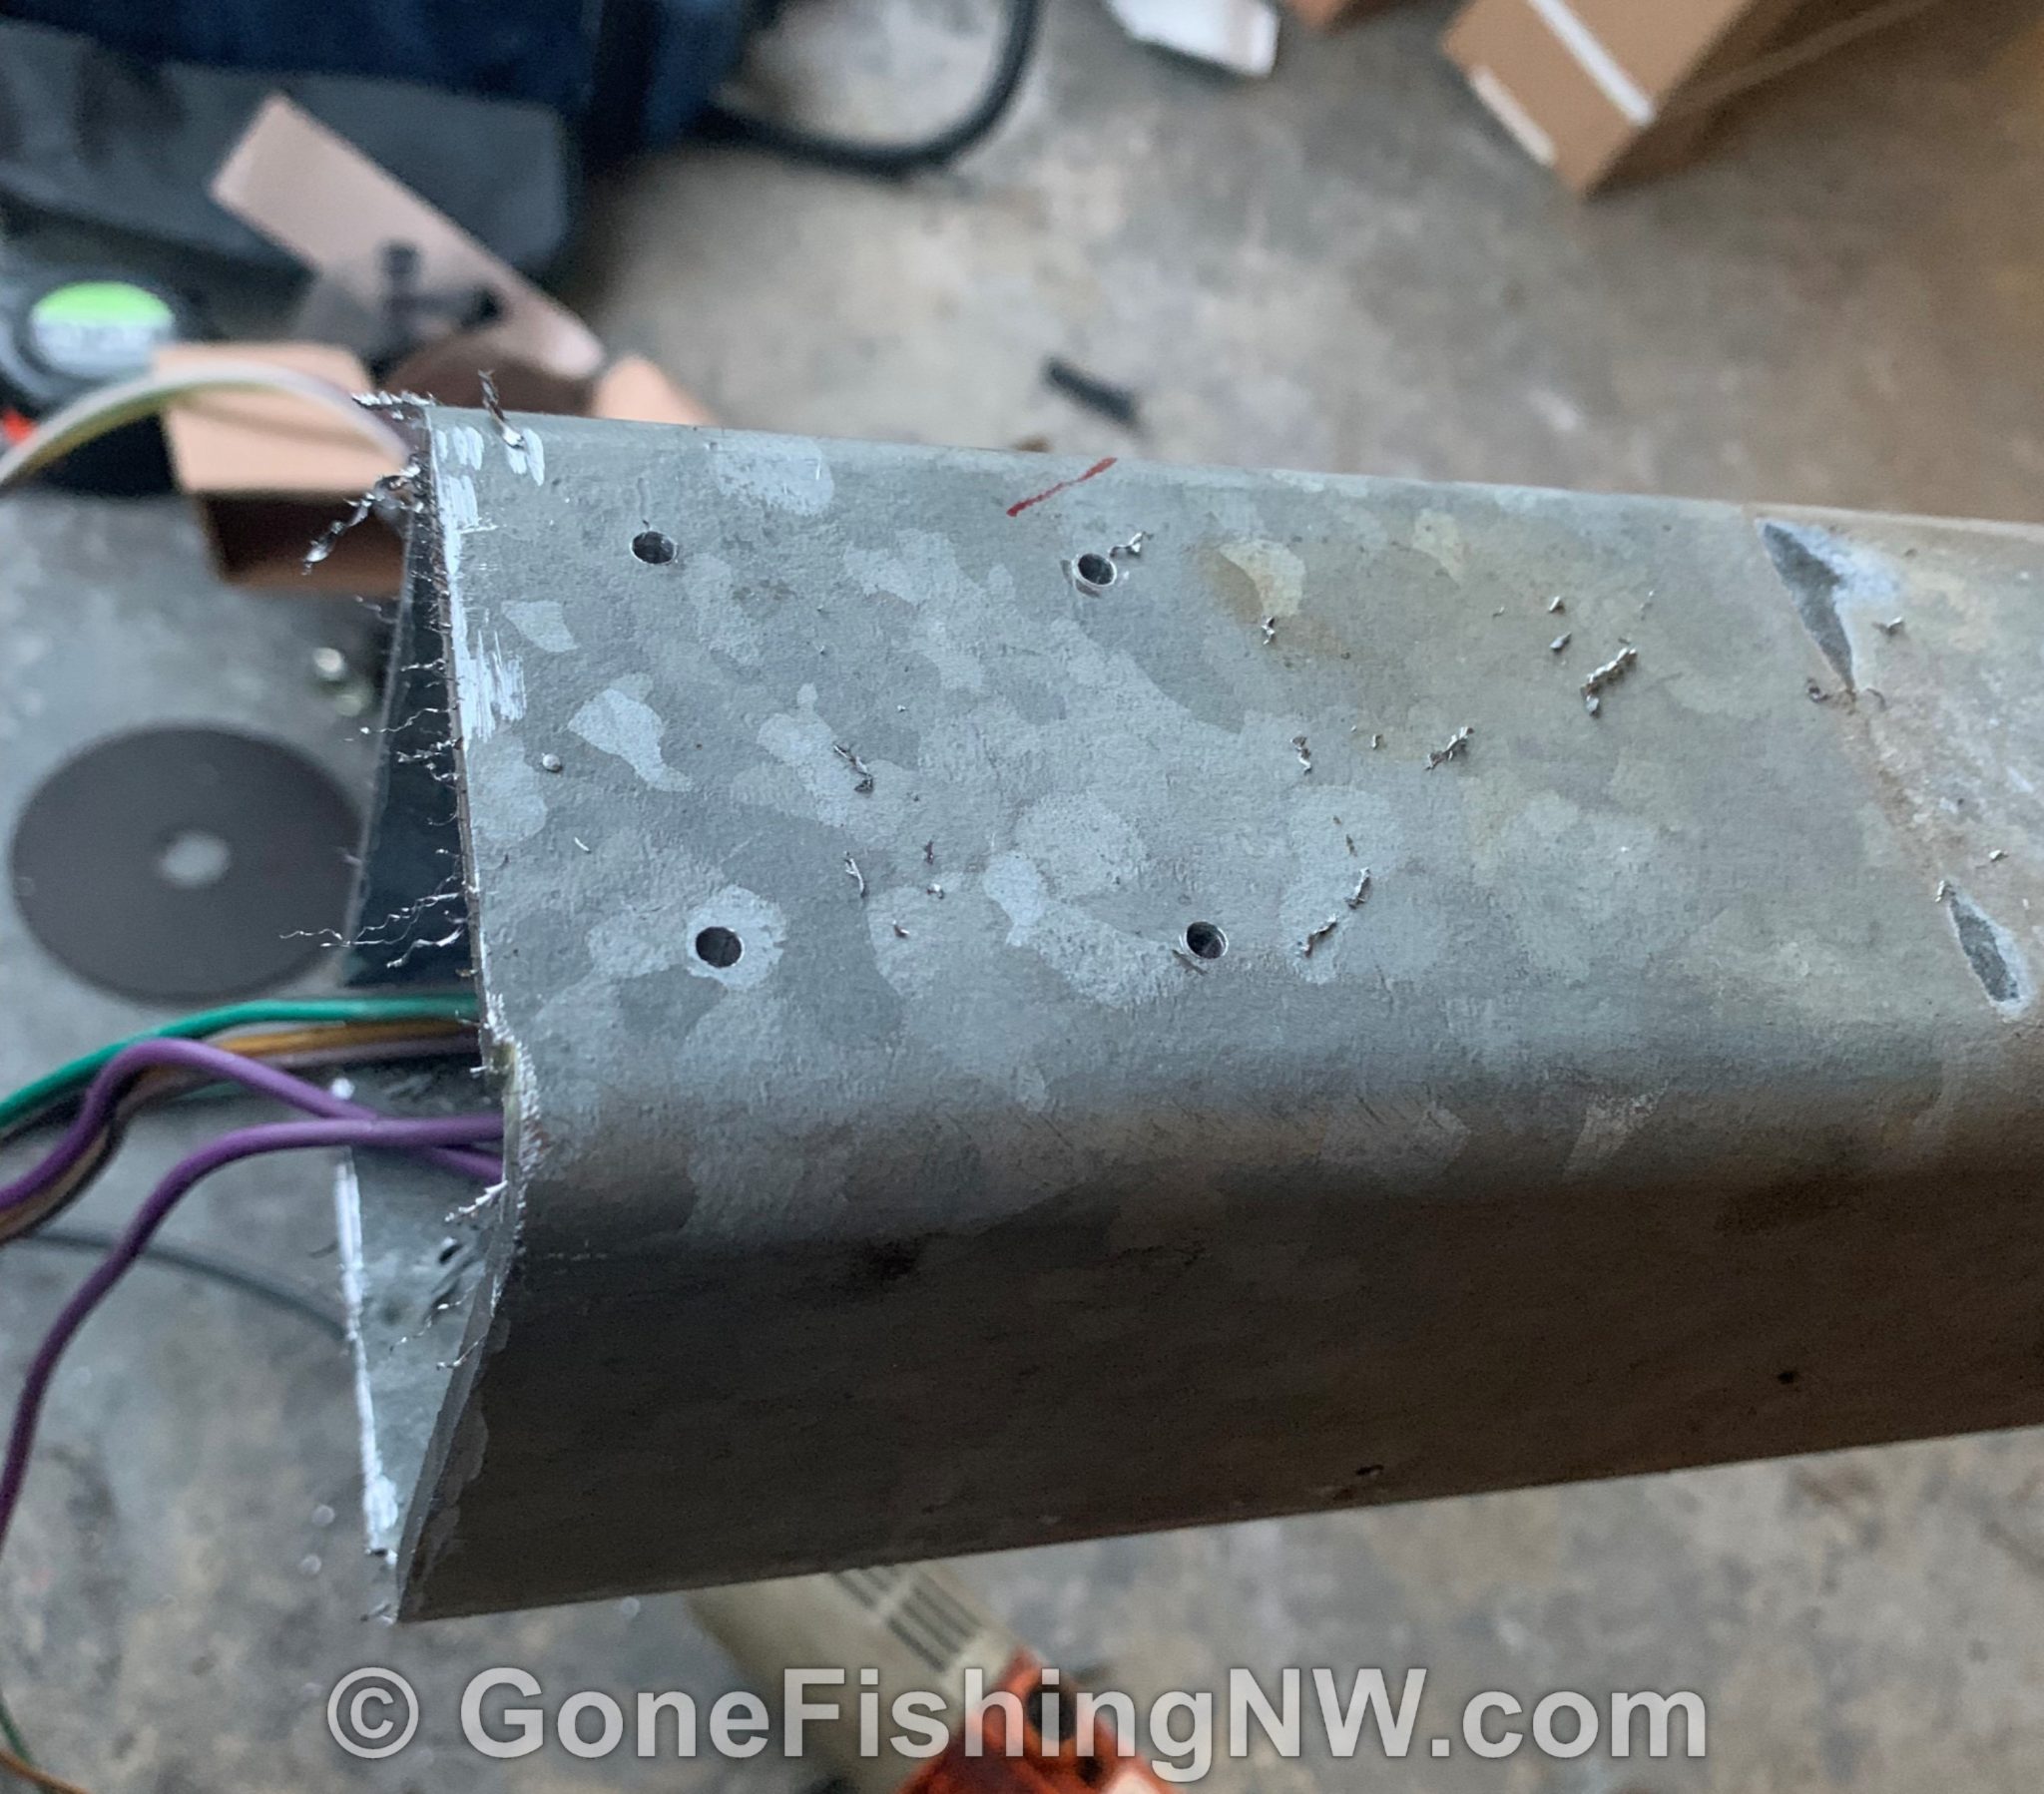
I didn’t want to snake all the wires out of the tongue and back during the project. Instead, I thought I could be careful enough to cut off the tongue and not cut the wires. This worked out well. I marked around the tongue where I needed to cut, then started with the angle grinder along the top, then down both sides. I was then able to bend the tongue down slightly and see the wires. Using a thin piece of plastic, I was able to catch the wires and pull them up to the top of the inside of the tongue. I secured this setup with some tape and then cut the bottom of the tongue with the grinder.
The tongue was much heavier than I expected. When you get near the end of cutting try to have a friend hold the end, so it doesn’t just drop to the ground. If you don’t have a friend handy then set up some blocks of wood or such to hold the end up during that final cut.
When done cutting the tongue off, I recommend running a file over the end to remove any burrs. This is also a good time to clean up a little with a shop vac.
Drilling the Holes
Make sure to use the punch included with the hinge to mark where to drill the holes. That will help keep the drill bit centered. The instructions are to drill 4 times per hole – starting with a 1/8 inch bit, then 1/4 inch, then 3/8 inch and lastly 1/2 inch. Generally, this worked well to keep the holes centered, and for the drilling to go easy.
What I found is that after drilling all 8 holes for one side of the hinge is that a couple of the holes had drifted off-center just enough to make putting the bolts through hard. I was able to quickly fix it by running the 1/2-inch drill bit through with the hinge in position to keep the bit centered.
For the other half of the hinge, I improved my technique. I secured the hinge half to the tongue with a couple of clamps. Then I marked the holes with the punch and drilled them – all with the hinge still attached. The hinge holes kept that final drill bit correctly aligned.
Even though I started with some drill bits that were rated to drill through metal, they did dull up during the project. I found it handy to have a second set of drill bits handy. Sharp bits – and a strong drill – makes the drilling go fast.
When drilling there will be a lot of small pieces of metal that will come off. These pieces will be sharp and hot from all the friction. For the most part that wasn’t a problem. However, when drilling up on the trailer those pieces will fall down right on your hand. One larger piece burned my hand and left a mark for a couple of days. So highly suggest using gloves while drilling. You also want to make sure the trailer sits high enough to get your drill and bit underneath it.
One thing I discovered in the middle of drilling was that the winch arm prevented me from getting my drill in position for those upper holes in the trailer. I wound up having to take the winch arm off. That was a bit of a pain. What was even more of a pain was getting it back on, since I had to jack up the boat to get the arm back into the right position. If you have the option of positioning the hinge farther from the arm to avoid this issue or if you can have the boat off the trailer, then I’d recommend that.
When done drilling a round file can be used to remove any burrs and sharp edges from the holes. A quick use of the shop vac will clean up all the little pieces of metal that will be on the floor and inside the trailer tongue.
Fasting the Bolts
The instructions say to use a torque wrench when securing the bolts. I don’t have one and couldn’t find one to borrow, and I didn’t want to buy one just for this project. So I just tightened all the bolts down as hard as I could and considered it good enough.
The bolts in my kit came with a bit to use to tighten them. This worked great, but I would suggest a deep socket to put it in, otherwise, it would sometimes come out of the socket while tightening the bolts down.
I also suggest putting all the bolts in and hand tighten, before really cranking them down, so you can do any wiggling needed to get the bolts through the holes.
Putting It All Together
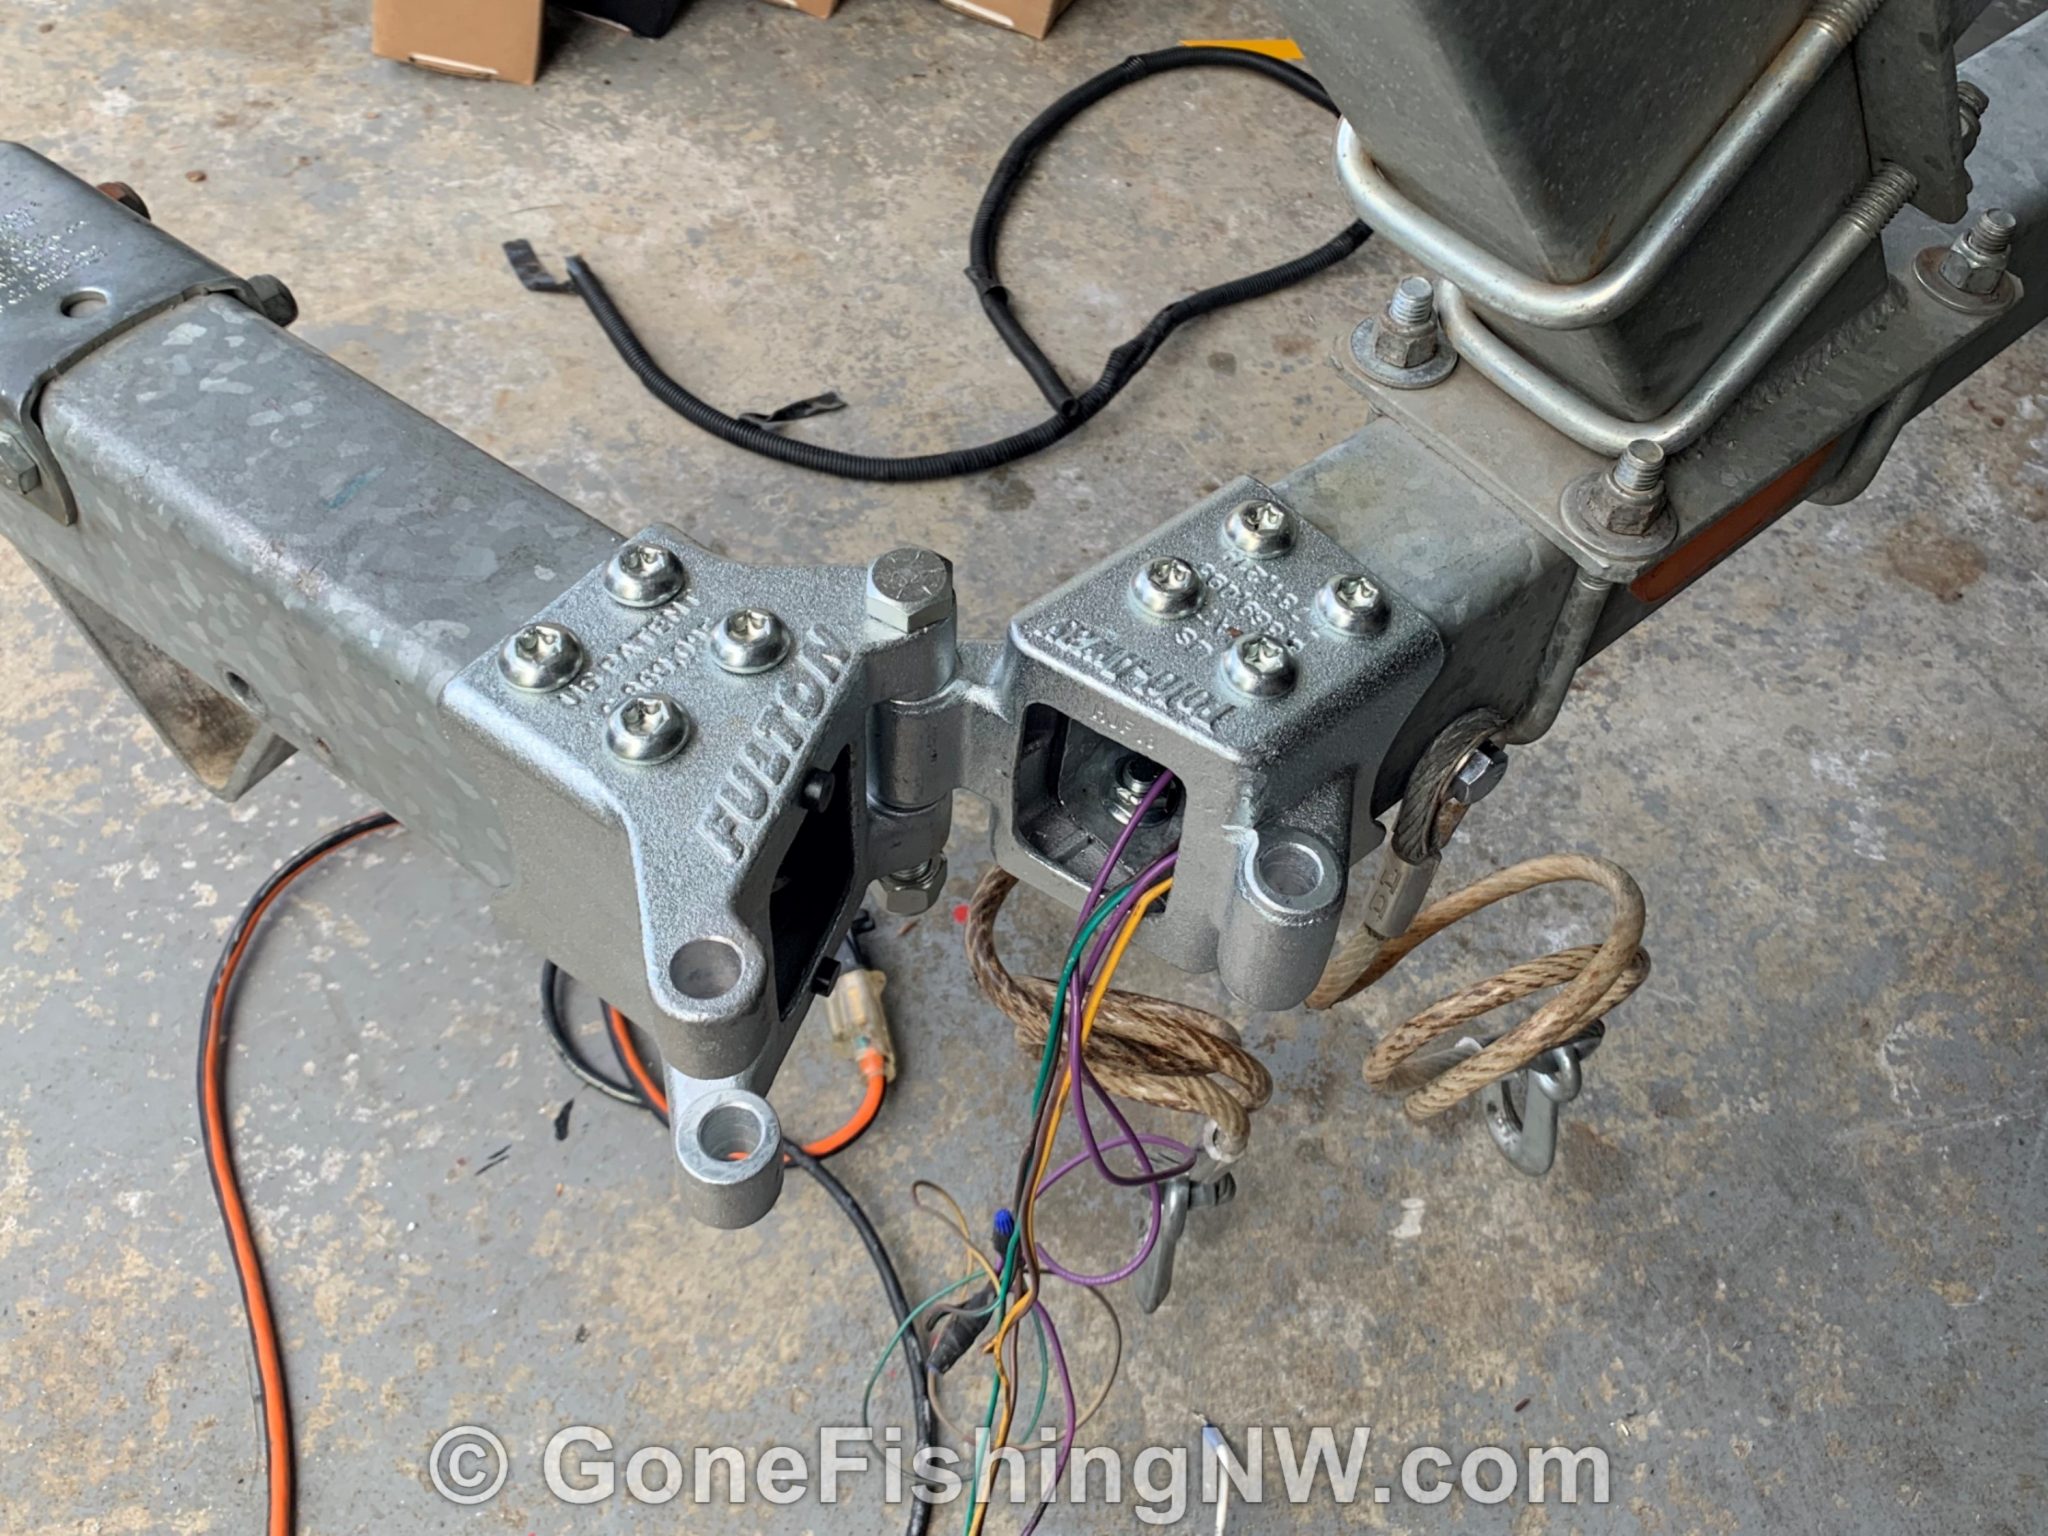
Attaching the two hinge halves together went smoothly. Running a little bit of grease on the pivot bolt helps it slide in smooth. I used the same stuff from the grease gun I use for everything.
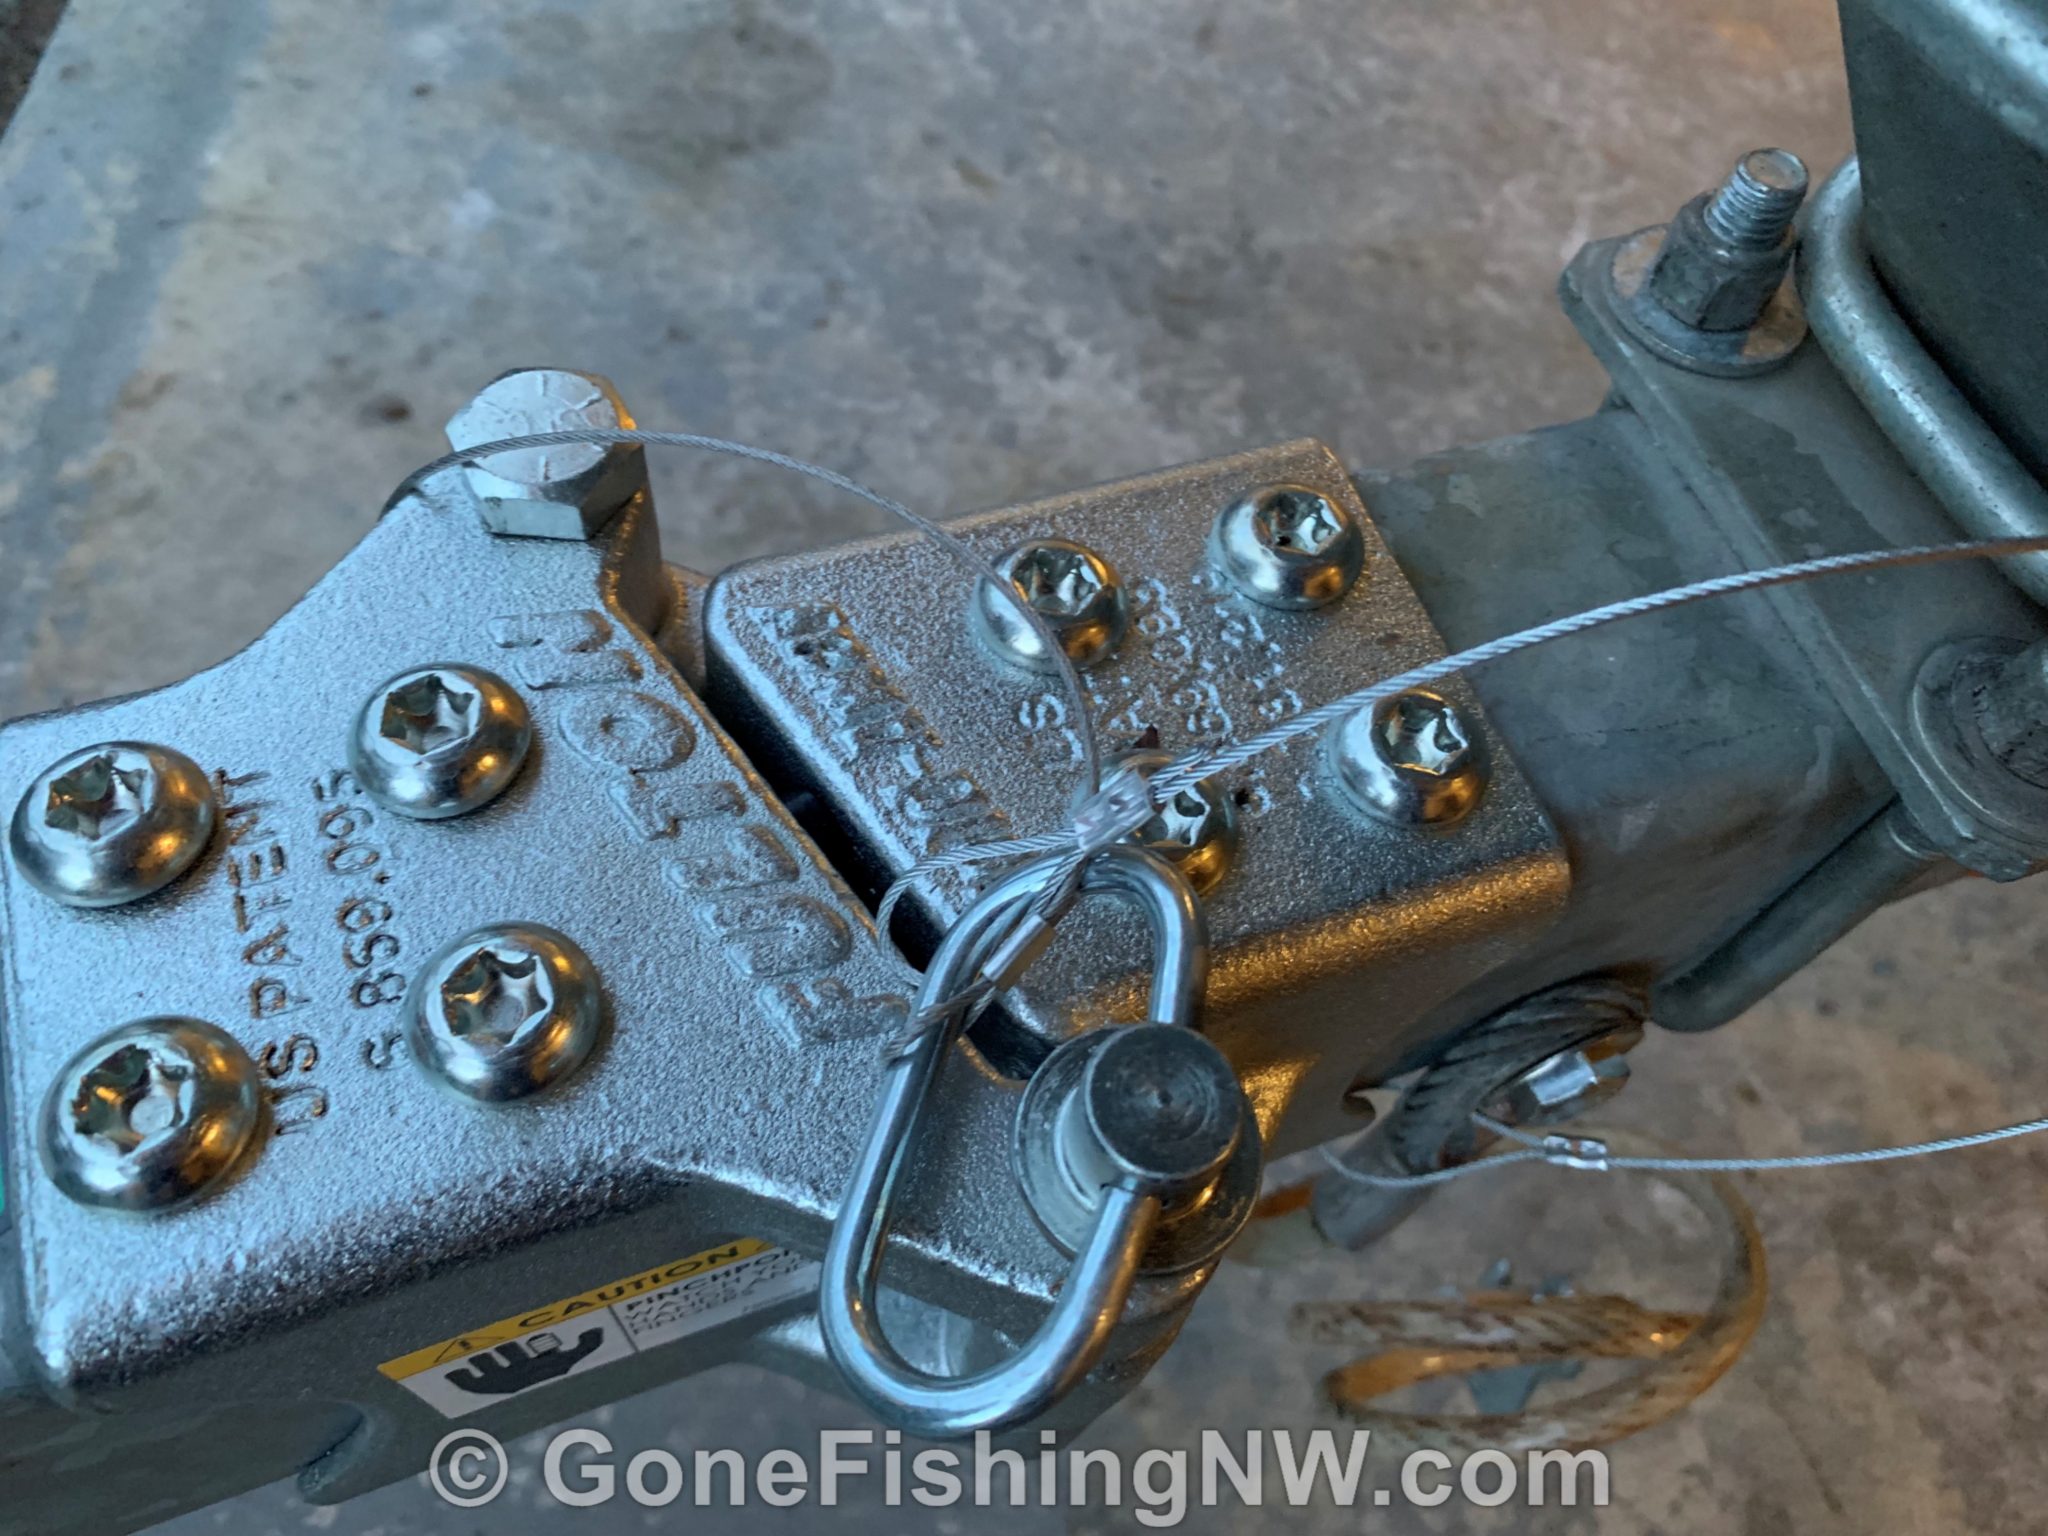
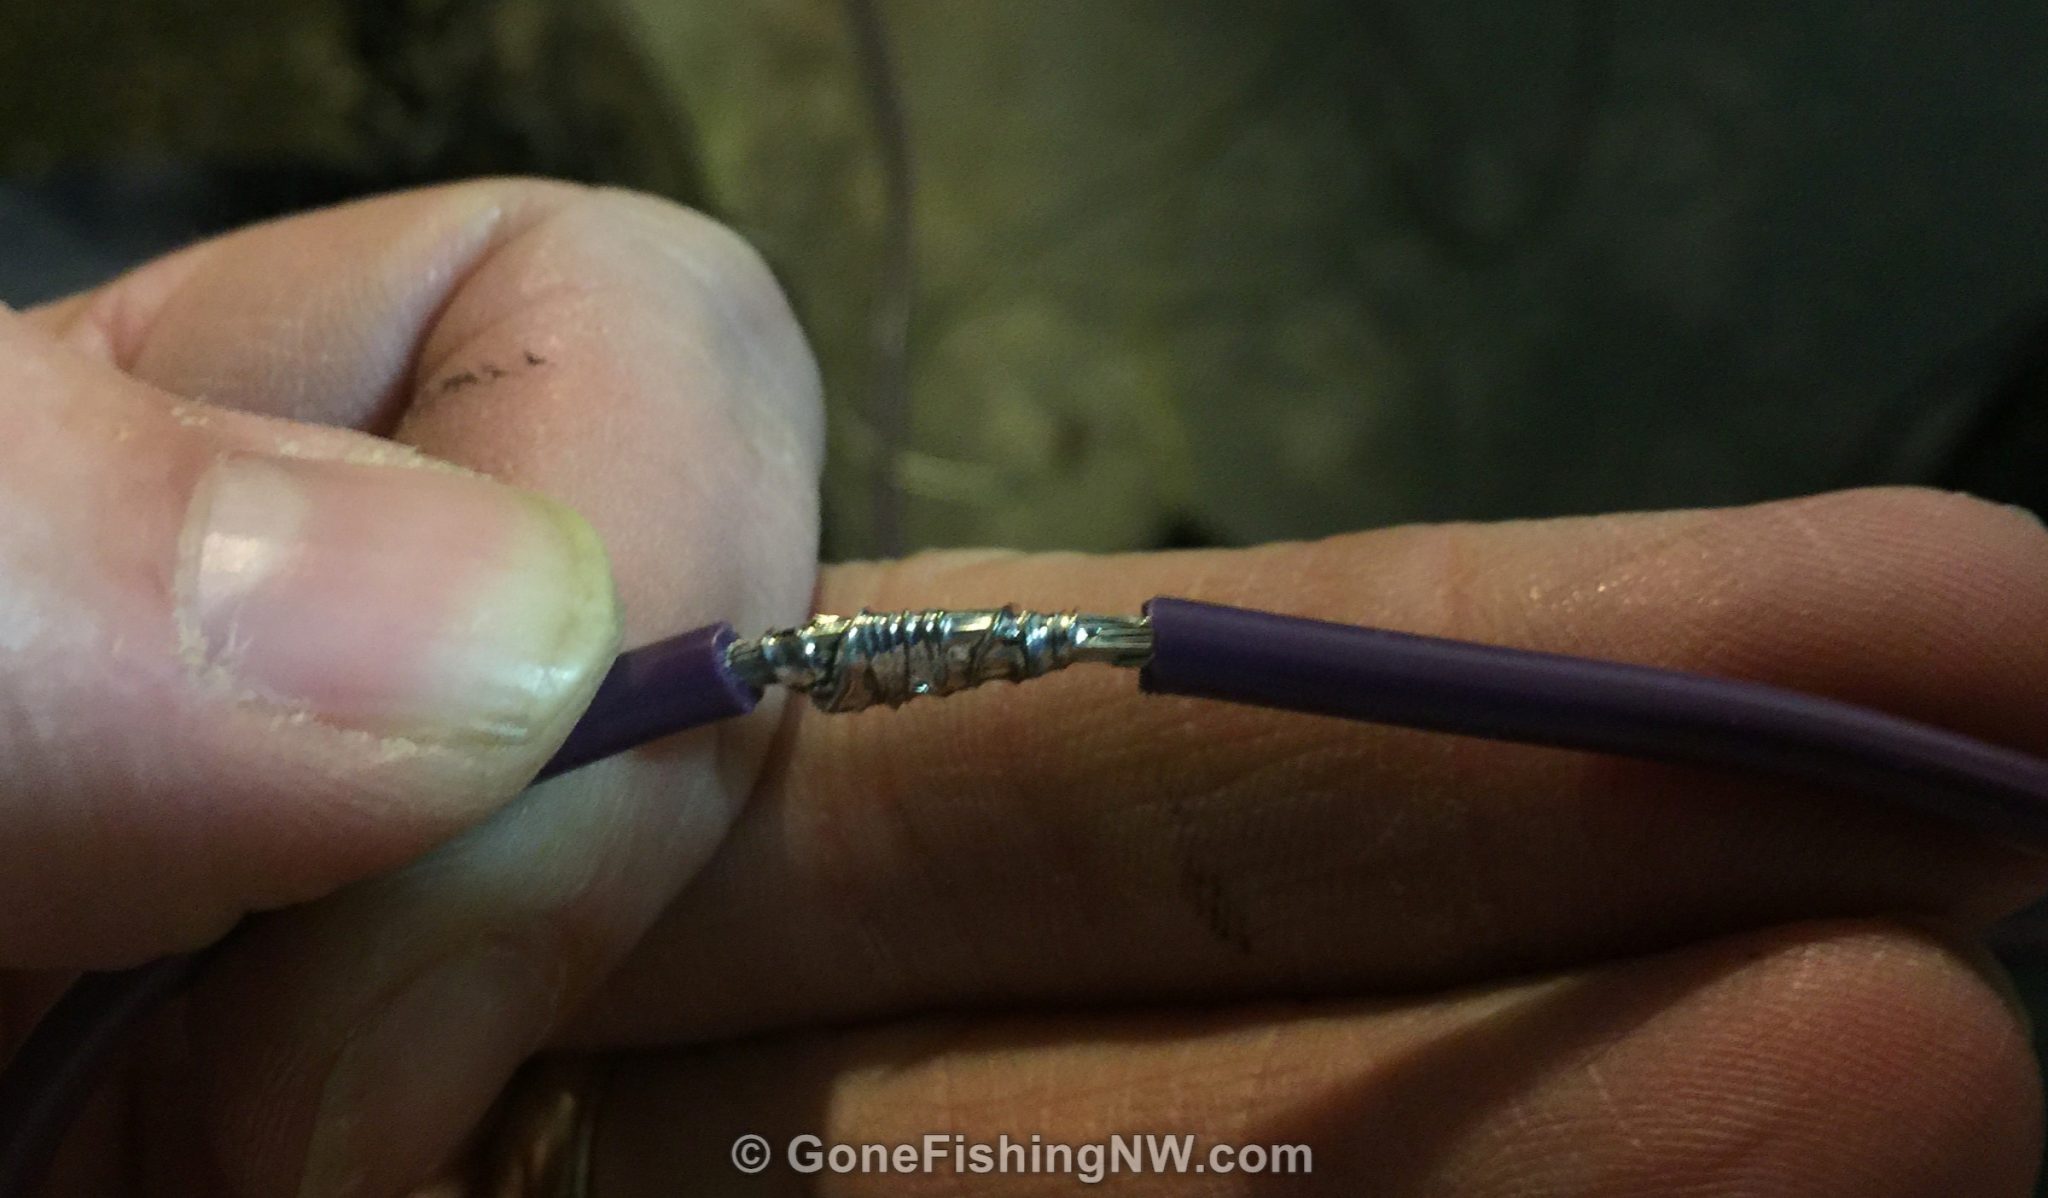
The hinge pin comes with a cotter pin to secure it when it is in position. That cotter pin comes connected to the hinge pin with a metal wire, so it can’t get lost. I copied that idea and got a length of wire and some crimping sleeves and used it to attach the pin to the trailer. That will prevent the hinge pin from being lost – or from someone taking it at a boat launch.
Hooking Up The Wires
Because I didn’t pull the wires completely out, it was easy to snake the wires through the front part of the tongue. Some fish tape with a little electrical tape to keep the wires secure, and I pulled them through quickly.
About every 6 inches of wire I would do a couple of wraps of electrical tape to keep them bundled together. I did this both for the part between the trailer and the plug, as well as the part that was accessible that runs inside the tongue.
I then installed the tubing around the wires. That adds further protection for the wires. While the tubing stays in position reasonably well by itself, I also added a few wraps of electrical tape occasionally.

Make sure there is enough slack in the wiring inside the tongue for when the hinge swings open to its maximum extent, but not so much that things bind up when the hinge swings closed.
Lastly, I reattached the wires to the plug. Since I had taken a picture at the start with the wires attached, it was easy to get them back in the right position.
In Use
Using the swing tongue is quite easy, as you can imagine. With the pin connected to the trailer by that wire I added, I don’t ever have to hunt around for it, or worried about it being lost.
However having a spare pin that you keep in the truck or boat would be a good idea, in case the pin ever gets lost or stolen. A stainless-steel bolt of similar dimensions would be a cheaper option. However, I wouldn’t tow very far and be extra careful if I had to resort to that.
Summary
Converting the trailer to have a swing (or fold away) tongue was a fun project, however, it did take much longer than I anticipated. I probably spent close to 8 hours working on it. But if I did it again, I could probably do it in half the time, as things like dull drill bits and underpowered cordless drills were a large part of why it took so long.
It made a significant difference in how much room the boat takes in the garage and was worth the time and cost. If you’ve been thinking about doing that same thing, I suggest you do it.
Good luck and tight lines!


Super helpful, been considering doing the same for a while. I have a bigger issue that i wonder if u have solution for. My boat on the trailer is too tall for my garage so I need to take air out from the trailer tires to get it in. Very painful and time consuming. Any ideas?
Glad you liked the article.
Sounds like a pain to deflate & reinflate the tires each time you take the boat out. I assume your garage is like mine – the entrance is a little bit lower than the actual ceiling. I’m also going to assume that there is something on your boat, like a windshield or tower, that contributes to making it tall. The last assumption is that you just need an inch or 2 to get the clearance you need.
Unfortunately, I can’t think of anything quick and easy, but here are some ideas which might help: 1) Can the boat be made to be less tall? Can the tower or windshields be converted to be removable, so you can stow them when you park the boat, and reattach when you take it out? 2) Can the entrance to the garage be made bigger? If the door doesn’t open all the way, then you may be able to adjust the opener so it does open all the way – thus giving you more clearance. Or could the entrance be remodeled to make it taller? 3) Can the boat sit lower on the trailer? Like could the bunks/rollers be repositioned to sit a little bit lower? 4) Could the tires be replaced with smaller ones which would lower the trailer height?
Hopefully one of those ideas is feasible. If you do stick with deflating the tires, I do recommend reinflating once it is in the garage, as under-inflated tires would likely shorten the tire life. Inves
I would be very careful using the Fulton swing away, I have a 2018 thunder jet with ez loader trailer that had a Fulton swing away Tongue. The Fulton swing away broke after 2 1/2 years, hit my back of my truck causing a lot of damage. I wouldn’t put that back on my trailer there are other units on the market that are not cast iron, but made of fully welded steel.
Smaller tires would probably be easiest. Don’t know the specifics about your trailer, but maybe you could move your axle from the underneath the leaf springs to sit on top.
I hear horror stories regarding Fulton swing hinge! No one carries 3×4 swing hinge, why??
Thanks
Rob
There are 3×4 hinges, such as this one https://www.trailerandtruckparts.com/Fulton-Bolt-On-Fold-Away-Hinge-Kit-for-3-x-4-Tongues-up-to-6000-lb_p_599.html
There aren’t many brands of swing hinges, and Fulton seems to be the most popular – or at least easiest to find for sale. A hinge – of any brand – is going to be a weak point of a trailer, and require attention and maintenance to stay in proper working condition. Combine those factors and it isn’t surprising that there are stories about failures and that Fulton would be mentioned in many of those stories. I haven’t had any problems with mine, and keep an eye on it to make sure it is in good working order when I tow
Many trailers have swing tongues. Total Engineering makes a weld on style similar to the swing tongues on Rogue Trailers that Alumaweld boats sit on. Follow intructions and specs. Mine was a Fulton Weld on 3″ x 4″. I had professional welder join the sections to the hinge in about 15 minutes for $40 cash. He had to grind off the galvanize first however where the weld was going to be. The gases from the galvanized are not good. Once the weld is done you can coat the entirie tongue with ZRC Galvanite coating with a brush for protection.
250 to 300 sounds about what I earn in the 8 hours you spent doing this project plus not having to buy two sets of drill bits and borrowing or renting larger drill and burning your self. The boat shop price seems reasonable.
Both both DIY and hiring out a job are legit choices. What is best choice for one person isn’t always the best choice for someone else – it all depends on what one wants at the end. Is it just to have the job done? Or is it also the experience of doing the job?
For example take our shared hobby of fishing. We could go buy salmon in the store for cheaper than it costs to fish for it. Just the expense of buying and maintaining a boat means you have to be bringing home quite alot of salmon just to reach break even, and that doesn’t count costs like fishing license, fishing gear, boat launch fee, gas and all the other stuff. We go out and do it, not because it is the cheapest or easiest way to put salmon on the table, but because we enjoy it and get something more out it than the actual fish – we want the experience of fishing, being out on the boat, reeling in those fish, spending time with our friends, and seeing if we can outwit the fish that day.
Likewise for me this project was about more than just having the swing tongue. Despite the obstacles I enjoyed doing the project and learned from it. I wound up with an experience to share on the website that other people, like yourself, can read and perhaps benefit from my experience. So I consider it a successful project in ways which aren’t expressed in dollar signs.
That said there are other things that I just want to have done, and would rather hire someone else than spend my time doing it – such as changing the oil in my car. But I’m sure there are those who prefer to change the oil themselves, for whatever reason – and that is OK too.